Getting more from your Phone Camera
Have you ever wanted to understand the features of your Phone Camera? This blog goes through some basics to help you get more out of your camera. Using your phone to take pictures is convenient and very easy. I have always loved taking photos, and knowing I always have a camera on me, means I am ready to capture moments when they arise, and you can too with confidence to be as creative as you want.

Colosseum at night – taken with iPhone 7+
As technology advances, so does its capabilities to do more. The camera’s on Phones these days are fantastic, and travel photography has never been so easy. In this post, you will get to understand your phone Camera. I am a massive fan of my DSLR and love taking it with me, but during a trip to Europe in 2017, I only took my iPhone 7+. I know how excellent phone cameras can be for travel photography, but there are a few limitations. However, I could still get 95% of the shots I wanted.
Let’s look at a few basics to help you get the best from your phone camera and travel photography tips.
GENERAL TIPS for taking photos with your Phone Camera
Your phone camera works great, but these few accessories can help you go the distance and set up great shots.
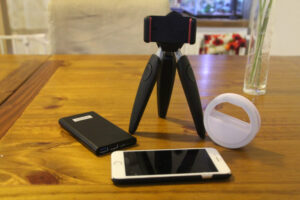
phone with helpful accessories
Accessories
-Small Tripod (this can double as a selfie stick), great for setting up shots and for low-light photos requiring a steady hand.
-Battery Pack and lead to charge your phone during the day.
-Small cleaning cloth
Extra’s you may consider to take your pics to the next level.
-Wide-angle lens
– Lensball
– Ring light
Camera Care
Just like a DSLR or point & shoot camera, you can do a few things to ensure your phone is ready to take the best possible photos.
Clean the lens areas and screen with a cleaning cloth, making sure it is clear of dust and dirt.
Make sure you start your day with a fully charged phone and battery pack.
Get to know your Camera Phones capabilities.
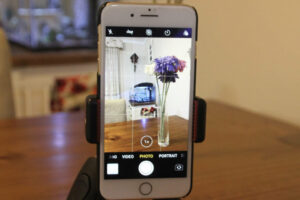
Gridlines and photo screen with options for iPhone 7+
You can point your camera in the direction you want to capture and let it make all the decisions. With some knowledge and understanding, you can be more deliberate about how your photos turn out. All cameras have features that help you capture what you want, and phones these days are no different.
Let’s get technical
Turn on the GridLines
Why do we want grid lines?
In photography, the composition is created by following the rule of thirds, and gridlines help you achieve this.
To turn on the gridlines, you need to go into the settings of your phone, go into the camera tab and enable the gridlines.
Light
We know that light is essential to get the best photos, but what can we do to help improve the lighting in a shot?
– I would not suggest using the flash unless needed.
You can have it ON, OFF, or AUTO if you click the lightning icon. The setting you choose will be highlighted; my go-to is OFF.
Another way to adjust the lighting is by tapping the screen where you want the light focus to be. The camera will not only set light but will also be used as the main focal point. It will adjust the lighting to bring out that part of the photo.
Now let’s say the result is not quite what you wanted; there is something else you can do to get the result you want (or closer to it).
Touch the screen holding your finger down for a few seconds, a yellow square with a sun will appear; the sun is actually a slide to change the lighting. By sliding the sun up or down, your composition will change, as will your results.
Focal Points
When you open the camera, it will automatically set the focus, but there are a few simple things you can do to change the focal point.
Say you want to capture an intriguing tunnel but are not happy with the camera’s focus, making the tunnel dark. To highlight an area, tap on that area, and the phone will adjust the lighting.
If you want to hold your settings for multiple photos, use AE/AF LOCK. This stands for AE stands for Auto Exposure, and AF stands for Auto Focus.
To turn it on, you touch the screen where you want the focus locked and hold until AE/AF LOCK appears at the top of your screen. This setting is locked until you touch the screen or shut your screen.
Modes

Food taken in Portrait mode- iPhone 11pro max
Just like other cameras, you have the choice of modes.
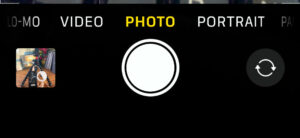
Along the bottom of the screen are 7 modes: Time Lapse, Slo-mo, Video, Photo, Portrait, and Pano. The first three are more video focussed, but the last 4 allow us to capture different styles of photos.
Let’s focus on the photo modes.
Photo is your basic point-and-shoot option, with the option of taking live pics, and also captures a second of video.
Portrait allows you to blur your background. To use this option, follow the prompts that appear on your screen.
Now, if you want to capture a burst of multiple images, just hold your finger on the shutter button.
Pano allows you to take more comprehensive photos. Follow the prompts on the screen. Press the button and move the arrow along the line as long as you want to capture. This will give a photo with greater scope, fantastic for those sweeping views.
Using Selfie Mode

Us at the Maheno shipwreck
We need to discuss one more important feature on your phone: the front-facing camera or selfie mode. Switching between the two screens is very simple; at the bottom of the camera screen, you will find two arrows creating a circle. Just tap this icon, and the phone switches camera. When using front-facing cameras, you can not only use Photos, but you can also use portrait and video options as well. Once you are done using the front camera, you simply hit the icon again, and you will be back on the rear-facing camera.
two arrows switch between rear and front-facing cameras
Want to know more?
Here are some Videos to help you understand your Phone Camera, along with practical demonstrations of each of the features of an iPhone. These tutorials were filmed on my 7+ phone, but they are still helpful today.
https://www.youtube.com/watch?v=RkJumOLG_JAhttps://www.youtube.com/watch?v=_ea0ky-ViuMhttps://www.youtube.com/watch?v=bfLgquJHuVohttps://www.youtube.com/watch?v=uLUC6LawDBM&t=4shttps://www.youtube.com/watch?v=uLUC6LawDBM&t=4s
Bringing your Travel photos to life on your Phone Camera
The fun part about carrying your phone in most places is you can practice and get to know your camera before you travel.
Be bold and play with the different modes. Each has its merits, and by experimenting, you will discover how best to use your camera to suit your style.
Same Photo, different Perspective

The photo most people take of the Gazebo Salburg – iPhone 7+
We may be standing in front of the same places, monuments, artworks, or vistas as all the other tourists. However, we can still photograph them in our own way, from a different perspective and have fun in the process.

a different perspective of the Sound of Music Gazebo Salburg- iPhone 7+
This blog post may be about taking photos and getting the most out of your phone camera. Please remember to enjoy being in the moment before pulling your camera. Having those special moments captured is important; with some knowledge, our creativity and abilities grow to the next level.
I hope this blog has been helpful in Understanding your phone Camera and inspires you to pull out your phone and get better acquainted with its camera.
If you have found this blog helpful, we would love to see the results.
Please share on our Facebook page.
If you are looking for more blogs from Sapphire blue Travel, check out our blog library here.
* Disclaimer
When the post was originally published, I was using an iPhone 7+. Today, I use and know an iPhone11pro max. Most of the information above converts to other phones. The feature may have another name and work slightly differently. Check out all the amazing features your phone has. Understanding your Phone Camera and some of the basic features gives you control and the confidence to explore your creative side and try things you may never have thought of.

